Creating Filters in Gmail
This option is quite implicit. But this is because in Gmail can create other actions, besides the to separate mail folders.
But the end of this note is to group the mail with the same parameters in the same folder. For example, Facebook or received mail.
not use Gmail folder, but has a tagging system to organize your mail. The idea is then that Gmail automatically label certain mail received and hide the input box.
For this we go to the configuration:
After the flap Filters, and click on "Create a new filter ."
In this part we can choose the features that will have the mail filtering. For example if we want to filter mail from Facebook in the " From: " wrote Facebook. Also you can filter mail containing certain words.
completed this step click on "Next Step " . In this part we choose actions that we see fit. To nuetras goal, we must make a choice " Skip the Inbox (Archive it) " (not display the filtered mail in the inbox) and "Apply the label ", choose the label you want. We can create a label from there.
can also choose several other options, and mark them as read, forward to another mail, delete, etc.
When finished, click on "Update Filter ."
Now to access the "folder " we see on the left bar there are several links to the different labels printed. By clicking on the corresponding label can display the filtered mails.
Saturday, January 30, 2010
Tuesday, January 26, 2010
How To Switch Fron Camera In Nokia E71
MP3 files with Audacity Cut
With Audacity can do it in the simplest of steps and also a given that an application is free and platform, which adds a few points.
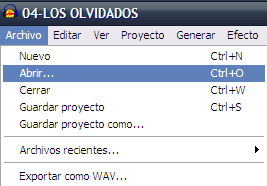
first thing do is open the file to open it first Audacity and immediately we're going to File, Open . Select the file you want to cut and give to OK.
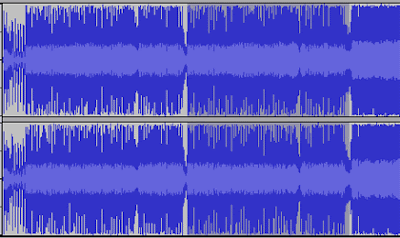
We represented the track will wave in the stream. Now we must select the specific part that we cut to this left-clicking the part that we want the start and drag and hold it until the part where we want to stop and release the left button.
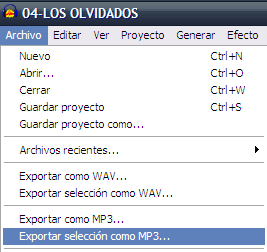
To verify that the correct selection is simply give the button with the symbol PLAY . If so proceed to the next step, export. For this we need first download the LAME libraries that Audacity offers free in their web . To export the selection we just go to File, Export Selection as MP3. We'll tell you where we want to save and name and we give OK.
End, as simple and fast. In this example we have made with an MP3 file, but the truth is you could make almost any audio file as Audacity offers endless possibilities.
Do You Need A License For A Moped In Greece?
Windows Ready Boost (Additional Memory Cache) Cree
One way to improve performance computers is by adding more memory, including RAM, but doing so can create some difficulties and sometimes a high cost. The concept is to use ReadyBoost USB flash memory as cache.
The cache is usually on the hard drive of your computer: So, what is proposed is that you use the hard drive but flash memory type, since the latter usually are faster than hard drives.
ReadyBoost lets users use a Flash memory device as Virtual RAM to improve the system without opening the PC, Windows ReadyBoost can improve system performance because it can retrieve the saved data in flash memory faster than recovering from the hard disk, decreasing the waiting time for your PC to respond.
Steps to enable ReadyBoost:
1 - Insert a USB flash memory
2 - Click on Start and then
Team 3 - Right click on the report
4 - Select the ReadyBoost tab
5 - Choose the device used
6 - Select the space you want to assign
Margarita Activewear Michigan
effortless home movies with Windows Movie Maker 2 pc automatically
With Windows Movie Maker 2 virtually anyone can make movies with your computer. Just create your story, edit images, add music and have already made your first movie!
To create a sequence of images:
1. Import the video on your PC. You will see the clips in the Collections view.
2. Double click on each clip to see how it looks in the preview window.
3. Once you have decided what to use for the movie, click and drag the clips to the sequence of imágenesen the order they prefer to appear in the final film.
4. To change the order of clips in the storyboard, drag and drop them anywhere you want.
To edit the clips
1.In the Timeline view click the clip you want cut.
2.In the Preview window, drag the scroll bar slowly and watch the video progresses.
3.Deténgase at the point where you want to trim the clip.
4.In the Clip menu, click Set initial trim point. 5.A
then continue to drag the progress indicator until you reach the point where you want to finish your clip.
6.In the Clip menu, click Set end trim point.
7.Ya has trimmed clip.
To add audio:
1.In the task pane, click Import audio or music. 2.Find
music track add to the film.
3.Click Import. 4.La
music track collection will appear at the hearing.
5.Click the Show Timeline button in the Storyboard section of the screen. 6.Arrastre
music track to the area of \u200b\u200baudio and music to the timeline ..
Monday, January 25, 2010
Sore Thyroid Gland Carbimazole
Hide Lighten
Something useful for when we leave the PC on performing a task and when it finishes one PC is turned off. For this you need to install any program or timer, Windows XP has a tool that makes and runs the command 'shutdown . "
To prove we can click on Start / Run and type:
To cancel the count down and prevent the machine is turned off we run:
For more command options can do: Start / Run Type cmd and press Enter. A window of 'Command Prompt' where writing shutdown and press enter, we will have more options to use with the command.
Something useful for when we leave the PC on performing a task and when it finishes one PC is turned off. For this you need to install any program or timer, Windows XP has a tool that makes and runs the command 'shutdown . "
To prove we can click on Start / Run and type:
shutdown-s-t xx
Where-s is used to give the shutdown command and xx is the time in seconds that must pass before off. For example if you type shutdown-s-t 60 the pc will shutdown in 1 minute. To cancel the count down and prevent the machine is turned off we run:
shutdown-a
If we write shutdown-s only time the countdown by default is 30 seconds. For more command options can do: Start / Run Type cmd and press Enter. A window of 'Command Prompt' where writing shutdown and press enter, we will have more options to use with the command.
Saturday, January 23, 2010
Free Adult Gifs, Free Animation
Homemade Firefox so
changing a few parameters of Firefox, we can make enough to lighten your browser.
This idea is based on the historiales.El history, is where you store the pages you've visited recently. Thanks to the history, by typing a few letters into the address bar, Firefox suggests the sites we visited that fit with what we write. What we do is change the amount of data that is stored in the historial.Vamos to:
In the address bar type: about: config
- Click on the button I'll be careful, I promise!.
Let's change the value of four fields:
- Browser.histor y_expire_days: Specifies the maximum number of days that keeps each url in history. (Default 180). Does not interest me to remember the sites I've visited so long ago. I just the most common, which I visit almost daily. I have reduced this value to 7, keeping only the sites visited in the past week. So, when I type something in the address bar, which suggests to me is really useful results, removing all the straw.
- Browser.histor y_expire_days. mirror: Same as above, indicate the same value (in my case, 7).
- Browser.histor y_expire_days_ min: The minimum number of days that Firefox saves each url in the history (default 90). In my case I reduced this value to 2. With these two changes, I tell Firefox to always keep my record over the last 2 days, but do not save save the urls visited more than 7 days.
- Browser.histor y_expire_sites: The maximum number of urls which keeps a history. I have limited to 20000, which I think is more than enough. Now Firefox keeps track of the days I have indicated, and only up to 20,000 urls.
Modifying these parameters have considerably lightened the database nte of my history. Now Firefox more accessible my record fast (there is less data to consult.) Firefox opens much faster and without radical change, if I notice that the browser is lighter and offers better performance.
Thursday, January 21, 2010
Bath Bodyworks Drugtest
: Apache + PHP + MySQL
collaboration tools is a OpenSource for Windows that facilitates the installation of Apache, MySQL and PHP in one tool, this feature makes it easier for the user and applications that are configured automatically. AppServ
installed on your computer in just a few seconds Apache, PHP , MySQL and phpMyAdmin , leaving the applications configured for immediate operation.
must first download the program free of charge: AppServ
Once downloaded, displayed, proceed to its installation. We found a welcome screen. We Click Next. Then we
a window that lets us choose the directory server. default is C: \\ AppServ , but we can choose the more comfortable we paresca. We
Click Next.
The next screen will let you choose the type of installation. It is recommended for novice users choose "Typical". We then Next.
Now we appear the configuration of the Server. Server Name box is left as the default to "localhost" and in Section Administrator E-mail Address or leave it as is the default and then change it, or we introduce a mail account that will be the administrator. The "HTTP Port" leave it as is the default (80), unless we want them to attend the server requests on another port. Next click on
Now we must choose a username and password to access the database section Charset MySQL.El we left as the default.
installation really starts showing us a progress bar until you see a screen that tells us it has completed the tender and leave options are marked by default. Finally click on Close
To check whether the installation was successful we enter the next page http://localhost . If everything is correct should appear a page with all the specifications used.
Saturday, January 2, 2010
What Happens To Sprem When Pregnant
Alternative WinRAR free to
7-Zip is a free program for data compression for Microsoft Windows (GUI), DOS and Linux.
7-Zip is an open source software. You can use 7-Zip on any computer, including a computer of a commercial organization. No need to join or pay to use.
Main Features:
- High compression ratio in new 7z format.
- 7-Zip is free software under the GNU LGPL.
- Formats Supported: Compression / Descomprecion: 7z, ZIP, GZIP, BZIP2 and TAR Descomprecion only: ARJ, CAB, CHM, CPIO, DEB, DMG, HFS, ISO, LZH, LZMA, MSI, NSIS, RAR, RPM, UDF , WIM, XAR and Z.
- Integration with Windows Explorer
- Powerful File Manager
- Translation to 74 Languages \u200b\u200b
Expenses Of Alcohol Poisoning
DAEMON Tools
Daemon Tools is basically an application for creating virtual CD drives on your hard disk and emulates the physical protection of some CD-ROM and DVD-ROM. Daemon Tool is compatible with: Windows 2000/XP/Vista/7.
The application allows you to select the number of virtual drives Windows to be created (up to 4 SCSI drives in the Lite version, 16 SCSI Standard Pro version and 32 SCSI drives, along with 2 IDE drives in the Pro Advanced version). For each, the user can upload an image, and to convince the OS that is actually inserted physical disk.
disk image formats supported:
bin / cue - CDRWinb5t - BlindWrite 5bwt - BlindWriteccd - CloneCDcdi - DiscJuggleriso - standard CD Imagemds - Alcohol 120%nrg - Neropdi - Instant CD / DVD
Subscribe to:
Posts (Atom)